
Primroses
First Wash
Primroses Step By Step
Stage 1.
If you are following my blog and are interested in my step by steps this is a great post for you!
I would like you to have a fresh piece of white paper in front of you and for this exercise you can work with your paper flat on a work surface. I mention working flat as I often work with my paper at an angle. But for this particulr subject and this stage of painting I want all the colours to merge softly on their own without any help from us, as artists.
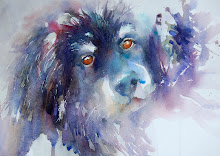
Imagine you have seen a cluster of flowers growing on a woodland bank or in your garden. Look at your white paper and imagine the top of the paper represents the sky area. The lower half of the paper is the grass,woodland leaves or ground that the primroses are to flower from. So these sections will be where you add colour to depict what you feel makes a great background. You can choose any colours you liek to surround your flowers. Be unique! Study my wash in the above image.
For those of you new to watercolour, a wash is a term used for when you cover paper with colour when working with watercolour. There is more information on techniques in my two books and DVDs but for now I am going to talk you through how I have covered my paper with colour for this first stage.
1) On DRY paper,constantly moving my brush in sweeps across the paper, I applied pale yellow in the central area of my paper.
2) Working away from this yellow wet section I introduced violet, allowing it to connect with the yellow and moved my brush downwards to the lower corners.
3) Above the yellow I worked with diluted Cerulean Blue working to the upper corners. I haven't been precise. I have been very relaxed and quite messy, allowing colours to flow into each other where they meet and connect.
4) My paper is now covered with colour but while my pigment is still wet I have loaded my size 10 brush with Cerulean Blue and flicked it onto the violet section allowing it to merge with the yellow and violet areas. This allows the colours to form a "new" mixed shade of green here that harmonises with the blue in the upper section.
5) With a very clean brush , I then loaded yellow onto my sable and flicked it onto the wet yellow section. This left a few darker dots for flower centres to be added later.
6) Leave this to dry. Do NOT fiddle! Don't try to paint flowers or leaves. Just allow the colours to merge gently on their own.
IMPORTANT! The colour needs to be very pale so we can build up in layers once it is dry.
Variations.
How about working with orange or gold against your yellow to represent an autumnal feel to the background as primroses often burst through golden carpets of woodlands. Or all blue around the yellow for a summer atmosphere of light freshness.
Try a few washes, avoid white areas on the paper and be gentle with your brush!
Take your time and enjoy watching paint dry, I do!


No comments:
Post a Comment